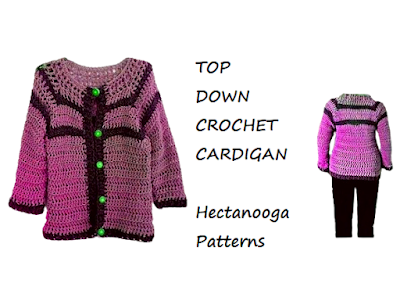
Search This Blog

Loading...

Monday, 20 May 2013

yt FREE SUMMER MESH SWEATER, make all sizes


YT SUMMER MESH PULLOVER SWEATER

Copyright © 2013, M. E. Harrington
This pattern may be printed for your personal use only. You may not in any form, reproduce, transmit, give away or distribute this pattern, including but not limited to images, diagrams and text, through any venue, including photocopying, other electrical or mechanical means, recording, or any other information storage and or retrieval system. Permission is granted to sell your finished garments.

                                       www.Hectanooga.etsy.com
                                  www.HatAndScarfPatterns.etsy.com
                                  http://www.youtube.com/user/Hectanooga1
~~~~~~~~~~~~~~~~~~~~~~~~~~~~~~~~~~~~~~~~~~~~~~~~~~~~~~~~~~~~~~~~~~~~~
                 Need Yarn?  Buy yarn here: http://tinyurl.com/HectanoogaYarn
             Want free patterns?  Tune in here: http://www.youtube.com/user/Hectanooga1

MATERIALS:
Worsted weight yarn
6 mm hook (U S J 10)
Yarn needle


INSTRUCTIONS:  Gauge is not important in this design
This design works as identical front and back. Works from top to bottom.
      Make 2:
1.  Make a foundation chain, with an uneven number of stitches, as long as you
     need to reach from wrist to wrist, or shoulder to shoulder for a sleeveless top.
    See  photos 1 and 2.  (To make a sleeveless shell, work from shoulder to shoulder.)
2.  Single crochet in the 2nd stitch from the hook, and in each stitch of the chain.
3.  Chain 3 and turn, *skip the next stitch, double crochet in the next stitch, chain 1, 
     repeat from * across the row, ending with a double crochet.
     (The double crochet stitches should line up throughout the pattern.)
4.  Chain 1 and turn, single crochet in each stitch across the row.
     (This means you will work into the top of the double crochet, and in the chain 1 space.)
5.  Repeat the sequence of step 3 and 4 until the work is long enough to reach from the shoulder to the
     under-arm, with one or two pattern rows for ease. (So as not to fit too tightly at the
     under-arm.)  End with one row of single crochet across the row, (step 4.)  Fasten off.
     See photo 5.


6.  Work the body section:
     Measure across the body at the chest.  Mark that measurement across the
     work, centering it. See photo 6 and 7. Make sure the 2 sleeves are the same length.
    Attach yarn on either side, photo 8, then beginning with step 3, repeat the sequence of steps 3 and 4 for
    as many times as you need to obtain the length needed. Photo 9 and 10.  Fasten off

    Make another identical piece.
    Sew together along the sides, and top of sleeves.  Make sure to leave an opening large
    enough to pull over the head.  Photo 11.
    (Methods of attaching: sew a seam with a needle and yarn; or slip stitch the 2 sides  together.)

    See a how to video for making the flowers shown here:

Wednesday, 1 May 2013

YT COWBOY BOOTS, newborn to 3 months

How to crochet COWBOY BOOTS BOOTIES. 
Size 3 to 6 Months.
by Emi Harrington
Copyright, 2013, Emi Harrington

Permission is not granted to copy or distribute this pattern in any manner. 
If your friends would like a copy please send them here to retrieve their

BUY THE  PATTERN, WHICH INCLUDES THE BOOTS AND THE COWBOY HAT,
Here:  (3 PIECE SET of Booties and Hat and Vest,  instructions for newborn to 1 year)

4 PIECE SET HERE: (Hat, Boots, Vest, Skirt)

 
Video COWBOY BOOTS, PART 1:

Video COWBOY BOOTS, PART 2, plus STAR and FLOWER:


MATERIALS:
Worsted weight yarn
Crochet Hook, size 4.5mm
Yarn needle
Buttons optional
Right and left booties are worked the same

COPYRIGHT: Emi Harrington
Permission not given to make copies, only the one used by you.
Refer friends here to get their own copy:
http://hectanoogapatterns.blogspot.ca/2013/05/yt-cowboy-boots-newborn-to-3-months.html

NEWBORN TO 3 MONTHS:
Working with one strand of worsted weight yarn, and a size 4.5mm crochet hook:
1.  Chain 6, single crochet in the 2nd stitch from the hook, and in each stitch of the chain.
     *Chain 1 and turn, single crochet in each stitch across the row.
     Repeat from * for 4 more rows.
2.  Chain 1 and turn, single crochet in the same stitch as the chain 1, single crochet across the row, make 2
     single crochet in the last stitch.
     *Chain 1 and turn, single crochet across the row, repeat from * for 4 more rows.
3.  Chain 2, half-double crochet all around the 4 sides of the sole, stitch to join.
4.  Chain 1 and turn, single crochet in each stitch around, slip stitch to join and fasten off.
     Sole finished.

5.  Mark the row where the increase in stitches occurred.
     Attach contrasting color yarn in one side, in the stitch directly above the marked stitch.
     Chain 1, single crochet in each stitch around, slip stitch to join.
     Chain 1, working around the front of the bootie, single crochet in the next stitch,
     *skip the next stitch, half-double crochet in the next stitch, repeat from * around the front of the bootie,
     until you reach one stitch before the marked stitch, single crochet into the marked stitch, and single
     crochet in each remaining stitch around, slip stitch to join.

6.  *Skip the next stitch, half-double crochet in the next stitch, repeat from* 
     2 more times, single crochet in each stitch around, slip stitch to join.

7.  Skip the next stitch, double crochet in the next 2 stitches, skip the next 2 stitches,
     single crochet in the next stitch, and in each stitch around, slip stitch to join.

8.  *Chain 1 and turn, single crochet in each stitch around, slip stitch to join,
      repeat from * for 1 more row.  (Ankle section)

9.  Chain 1 and turn, single crochet around, making 2 single crochet in every 3rd stitch, slip stitch to join.

10.  *Chain 1 and turn, single crochet in each stitch around, slip stitch to join.
       Repeat from * for one more row. Fasten off.

11.  Attach contrasting color, chain 1, single crochet in each stitch around, slip stitch to join and fasten off. 
      Weave all yarn ends into the finished work.

OPTIONAL:  Attach contrasting color yarn, and single crochet all around the edge of the sole, slip stitch to join and fasten off. 

MAKE THE STAR:
Chain 5, slip stitch to join and form a ring.  *Chain 4, single crochet in the 3rd stitch from the hook, double crochet in the next stitch, single crochet in the ring.  Repeat from * to make a total of 5 points of the star, slip stitch to join in the base of the firsdt chain 4 of the row, and fasten off.

MAKE THE FLOWER:
Chain 5, slip stitch to join and form a ring. 
Chain 5, single crochet in the ring, (petal formed),  repeat from * to make a total of 5 or 6 loops, slip stitch to join in the base of the first chain 5, and fasten off.
(To make a larger flower, follow the above instructions, but make each loop with chain 8.)


CROCHET PROJECTS PLAYLIST, # 1 OF 2:


CROCHET A TEDDY BEAR:
http://www.youtube.com/watch?v=fxHxXINWlKs

 GET YARN AND HOOKS HERE: http://www.ashton11.com/supplies
Get My FREE Crochet Stitches Ebook: 
http://hectanoogapatterns.blogspot.com/2012/09/free-crochet-ebook-featuring-emi-from.html

My knitting stitches ebook:
http://hectanoogapatterns.blogspot.com/2012/09/learn-to-knit-with-emi.html

http://www.etsy.com/shop/Hectanooga (crochet, knitting, flowers patterns)
http://hectanooga.com/
 http://hectanoogapatterns.blogspot.ca/   
http://www.facebook.com/3CrochetChicks (patterns)
http://www.etsy.com/shop/mehartgallery (jewelry, fabric flowers, wedding accessories)
http://www.etsy.com/shop/ashton11?ref=seller_info (Knitting, and sewing patterns)
http://www.etsy.com/shop/Carlitto (sewing, crochet, knitting patterns)


HECTANOOGA FACEBOOK: http://www.facebook.com/pages/Hectanooga-Patterns/147605721944461

Hectanooga on Craftsy: http://www.craftsy.com/user/182117/pattern-store

Free Patterns: http://threecrochetchicks.blogspot.com/2012/09/free-baby-crochet-pattern-instant-download.html

Work from Home:  http://wahmjoboptions.blogspot.com/2012/09/free-witch-crochet-hat-pattern.html 


CROCHET PROJECTS PLAYLIST # 1 OF 2:
http://www.youtube.com/playlist?list=PL166DA68A2E700BDB&feature=plcp

Saturday, 27 April 2013

RUFFLED TOP BABY SANDALS, newborn to 3 Months

#463 BABY SANDALS, RUFFLED TOP AND STRAP
newborn to 3 months
by Emi Harrington, COPYRIGHT, 2012, M. E. Harrington

You may sell your finished items.
Permission is not granted to copy or distribute this pattern in any manner.  This means you not give it away for free, not post it on any blogs or web sites without permission.

If friends would like a copy of this pattern, please refer them to this blog to retrieve their own copy.
MATERIALS:
Worsted weight yarn,
5.5mm crochet hook, (6.5mm to make larger size)
Yarn needle
Buttons

INSTRUCTIONS: NEWBORN TO 3 MONTHS:
 Gauge is not important in this design.
See a how to video of this pattern here: http://www.youtube.com/watch?v=tTPLCVIqcWI

1.  Make the sole: (This is a new, simplified sole pattern.)
     Working with 2 strands of yarn (so the sole will be rigid):  Chain 4
    
2.  Single crochet in the 2nd stitch from the hook, and in each stitch of the chain.
     *Chain 1 and turn, single crochet across the row.  Repeat from * until the work measures 3 ¼ inches

3.  *Turn, single crochet in each stitch all around the rectangle, slip stitch to join.
     Fasten off and weave yarn ends into the finished work.  Sole finished.


MAKE THE UPPER:
Working with 1 strand of yarn.
Attach yarn in any stitch along the side back of the sole. Attach on either end, there is no front or back.
Evenly single crochet around to the stitch opposite the one you began in, on the other side of the sole.  (You may have to add stitches to evenly crochet around, because the sole is worked with 2 strands and the upper is worked with 1 strand.  8 stitches for newborn size were used in this sample.)
*Chain 1 and turn, single crochet across the row.  Repeat from * for 2 more rows.
At the end of the row, make the strap: Chain 11, single crochet in the 5th stitch from the hook (buttonhole formed), single crochet across the added chain stitches, and all across the row on the main body of the sandal.  Fasten off.
NOTE:  When making the sandal for the opposite foot, take care to begin on the opposite side of the sole.


MAKE THE STRAP AT THE TOE END OF THE BOOTIE:
Attach yarn in any stitch on the side front of the bootie.
Single crochet in 4 stitches.  *Chain 1 and turn, single crochet across the added stitches.
Repeat from * until the strap is approximately 1 inch longer than the sole is wide

Slip stitch the end of the strap on the opposite side of the sole, lining it up directly opposite.  Fasten off and weave the yarn ends into the finished work.

Sew a button on the opposite side of the strap. 
The sandals can be used at this stage as strap sandals.  


MAKE THE RUFFLED TOP:

1.  Chain 6, single crochet in the 2nd stitch from the hook, and in each stitch of the chain.
2.  *Chain 1 and turn, single crochet across the row.  Repeat from * for 3 more rows.
3.  Make the 1st row of ruffles:  Turn, *chain 5, single crochet in the next stitch, repeat
     from * for 3 more times. Photo 17.
4.  Make the 2nd row of ruffles:  Slip stitch into the next 2 rows of stitches.  Fold the
     work to easily identify the stitches across the row. Working across the row, *chain 5,
     single crochet in the next stitch, repeat from * across the row.
5.  3rd row of ruffles:  Slip stitch into the next 2 rows of stitches.  Fold  the work to
     identify the row of stitches, slip stitch into the first stitch, *chain 5, single crochet in
     the next stitch, repeat from * across the row.

6.  *Chain 2 and turn, double crochet in each stitch across the row. Fasten off.
    

   If you would like to block this section, do so now.  Either wet the work, and lay flat to dry on a towel, or arrange on
    an ironing board, and lightly steam, then allow to dry without moving.
    Attach the ruffled section to the strap by sewing it on with matching yarn.

    Pass the strap through the row of double crochet stitches.
    Sew a button on the opposite side of the strap.

    Weave all yarn ends into the finished work.

PATTERN WHICH INCLUDES SIZES FROM NEWBORN TO 12 MONTHS IS  AVAILABLE FOR SALE IN MY ETSY SHOP at this link: https://www.etsy.com/listing/103380864/crochet-pattern-baby-booties-sandals-num?ref=shop_home_active
  Need Yarn?  Buy yarn here: http://tinyurl.com/HectanoogaYarn
 Want free patterns?  Tune in here: http://www.youtube.com/user/Hectanooga1